Using Slit-Scan to Make Light Shows
Goals of this Chapter
- Obtain a basic understanding of slit-scan photography
- Learn some best practices for using the Slit-Scan template
What is the Slit-Scan Template?
One of the original templates in the MIT Illuminations App is called "Slit-Scan," which might not be as intuitive as other names like "Simple Gradient" or "Solid Color."
The Slit-Scan template has you upload an image (such as a photo) as an input, scans down the image's pixels row-by-row, and sends those colors to display on the lights. Depending on what source image you choose, this can create a really cool or really jarring effect!
If you're curious, the name of this template comes from slit-scan photography, otherwise known as photo finish photography, streak photography, or the "Time Warp Scan" filter on TikTok. It's often used to visualize the tiny details of high-speed events, or to create weird artistic effects by combining different moments of time into one static image.
In film photography, the slit-scan technique was accomplished by physically cutting narrow strips (called slits) out of back-to-back images and stacking them together. But now we can do this digitally by extracting rows of pixels from a video — which is, if you think about it, just a bunch of back-to-back images.
What photos make a good slit-scan show?
While building MIT Illuminations, we've developed some best practices that make the Slit-Scan template output more pleasing light colors and transitions. That being said, because art made with blinky lights is just as subjective as any other kind of art, these aren't unbreakable rules!
If you need help getting started with the Slit-Scan template, we have a whole chapter about creating shows in the MIT Illuminations App. One of the best ways to learn — and develop your own personal best practices — is to play around, uploading different images and changing some values to see what you like.
Resolution
Because there are 120 lights in the MIT Illuminations installation in the Welcome Center, any image that you upload into the Slit-Scan template needs to be at least 120 pixels wide. You can modify the code of the template to the length of your LED strip if you want, which would adjust the minimum number of pixels.
Either way, an image that's 120 pixels wide is a relatively low resolution for most photos. Unless you're creating a pixel art masterpiece, we recommend using photos with screen or web resolution (72dpi) so that the thumbnail image of the show is clear.
Resolution
In general, you want to pick a source image that has a handful of bold colors. Even though RGB LEDs can produce millions of colors, not all of them look equally nice as part of a light show.
- Images with subtle gradients of darker colors, such as dark browns or blues, don't tend to translate well to a light show. Your eyes may not be able to detect changes in the LEDs, or they may look like they're flickering and broken.
- Some images have an object on a solid black, white, or grey background. Large vertical swaths of these neutral colors may also make LEDs look broken. In this case, we recommend cropping the image more closely to the object.
- For images with a rainbow of vibrant colors, you'll want to pay extra attention to the
Scan Speedsetting. A Rainbow template exists, and it's easy to accidentally create a more chaotic or less intentional-looking version of that show with a busy Slit-Scan photo.

Some colors look harmonious together, while others clash. And different colors of light can also make people feel different things. The science and art of mixing colors falls under a study called color theory.
There are lots of online tools (for example, this one from Adobe) to help you understand which color combinations work well together. And reading guides about theater or concert lighting (for example, this one from Harman or this M.A. thesis) can give you a better sense of how different colored lights can set a mood or a scene.
Shapes
Remember that the Slit-Scan template scans down the image's pixels row-by-row. So an image with vertical stripes of color (such as an image of gel electrophoresis) can end up looking quite static on the lights. An image with horizontal stripes of color (such as the pride flag) can lead to sudden or jarring transitions between colors. An image of a circular object on a background (such as an artist's conception of a planet) will have a "ballooning" effect where a color appears on the center lights, spreads outward, and then contracts from whence it came.
Selecting images with color gradients rather than hard edges and vertical color variations will generally lead to more interesting shows.
Photographic Style
Professional-looking portraits of objects don't always translate well to an LED light show. Portraits of animals, people, or buildings have generally looked odd in our tests, especially when there's a limited amount of sharpness with a blurred background (like you see in Portrait mode photos taken by iPhones). Without getting into too much detail, photographers call this region of sharpness the depth of field, and it can also be added digitally as Gaussian blur.
We recommend that your chosen image has a consistent amount of sharpness, whether it's a photograph or abstract art. But, that being said, feel free to play and develop your own sense of taste. Maybe you'll find the translation of blurred image colors to LEDs twinkly and pleasing instead of strobe-like and abrupt!
Looping the Scan
When the Slit-Scan template gets to the last row of pixels in an image, it jumps back to the top row. This can lead to a really sudden and obvious transition at this point in your light show.
You could modify the CODE of the template to make it scan up-and-down instead of on a loop. But if you want to avoid doing that and have a seamless light show, you can just make sure that the image you upload contains a horizontal line of symmetry. There are plenty of free photo editors out there that can help you achieve this "movie magic," such as Pixlr or GIMP.
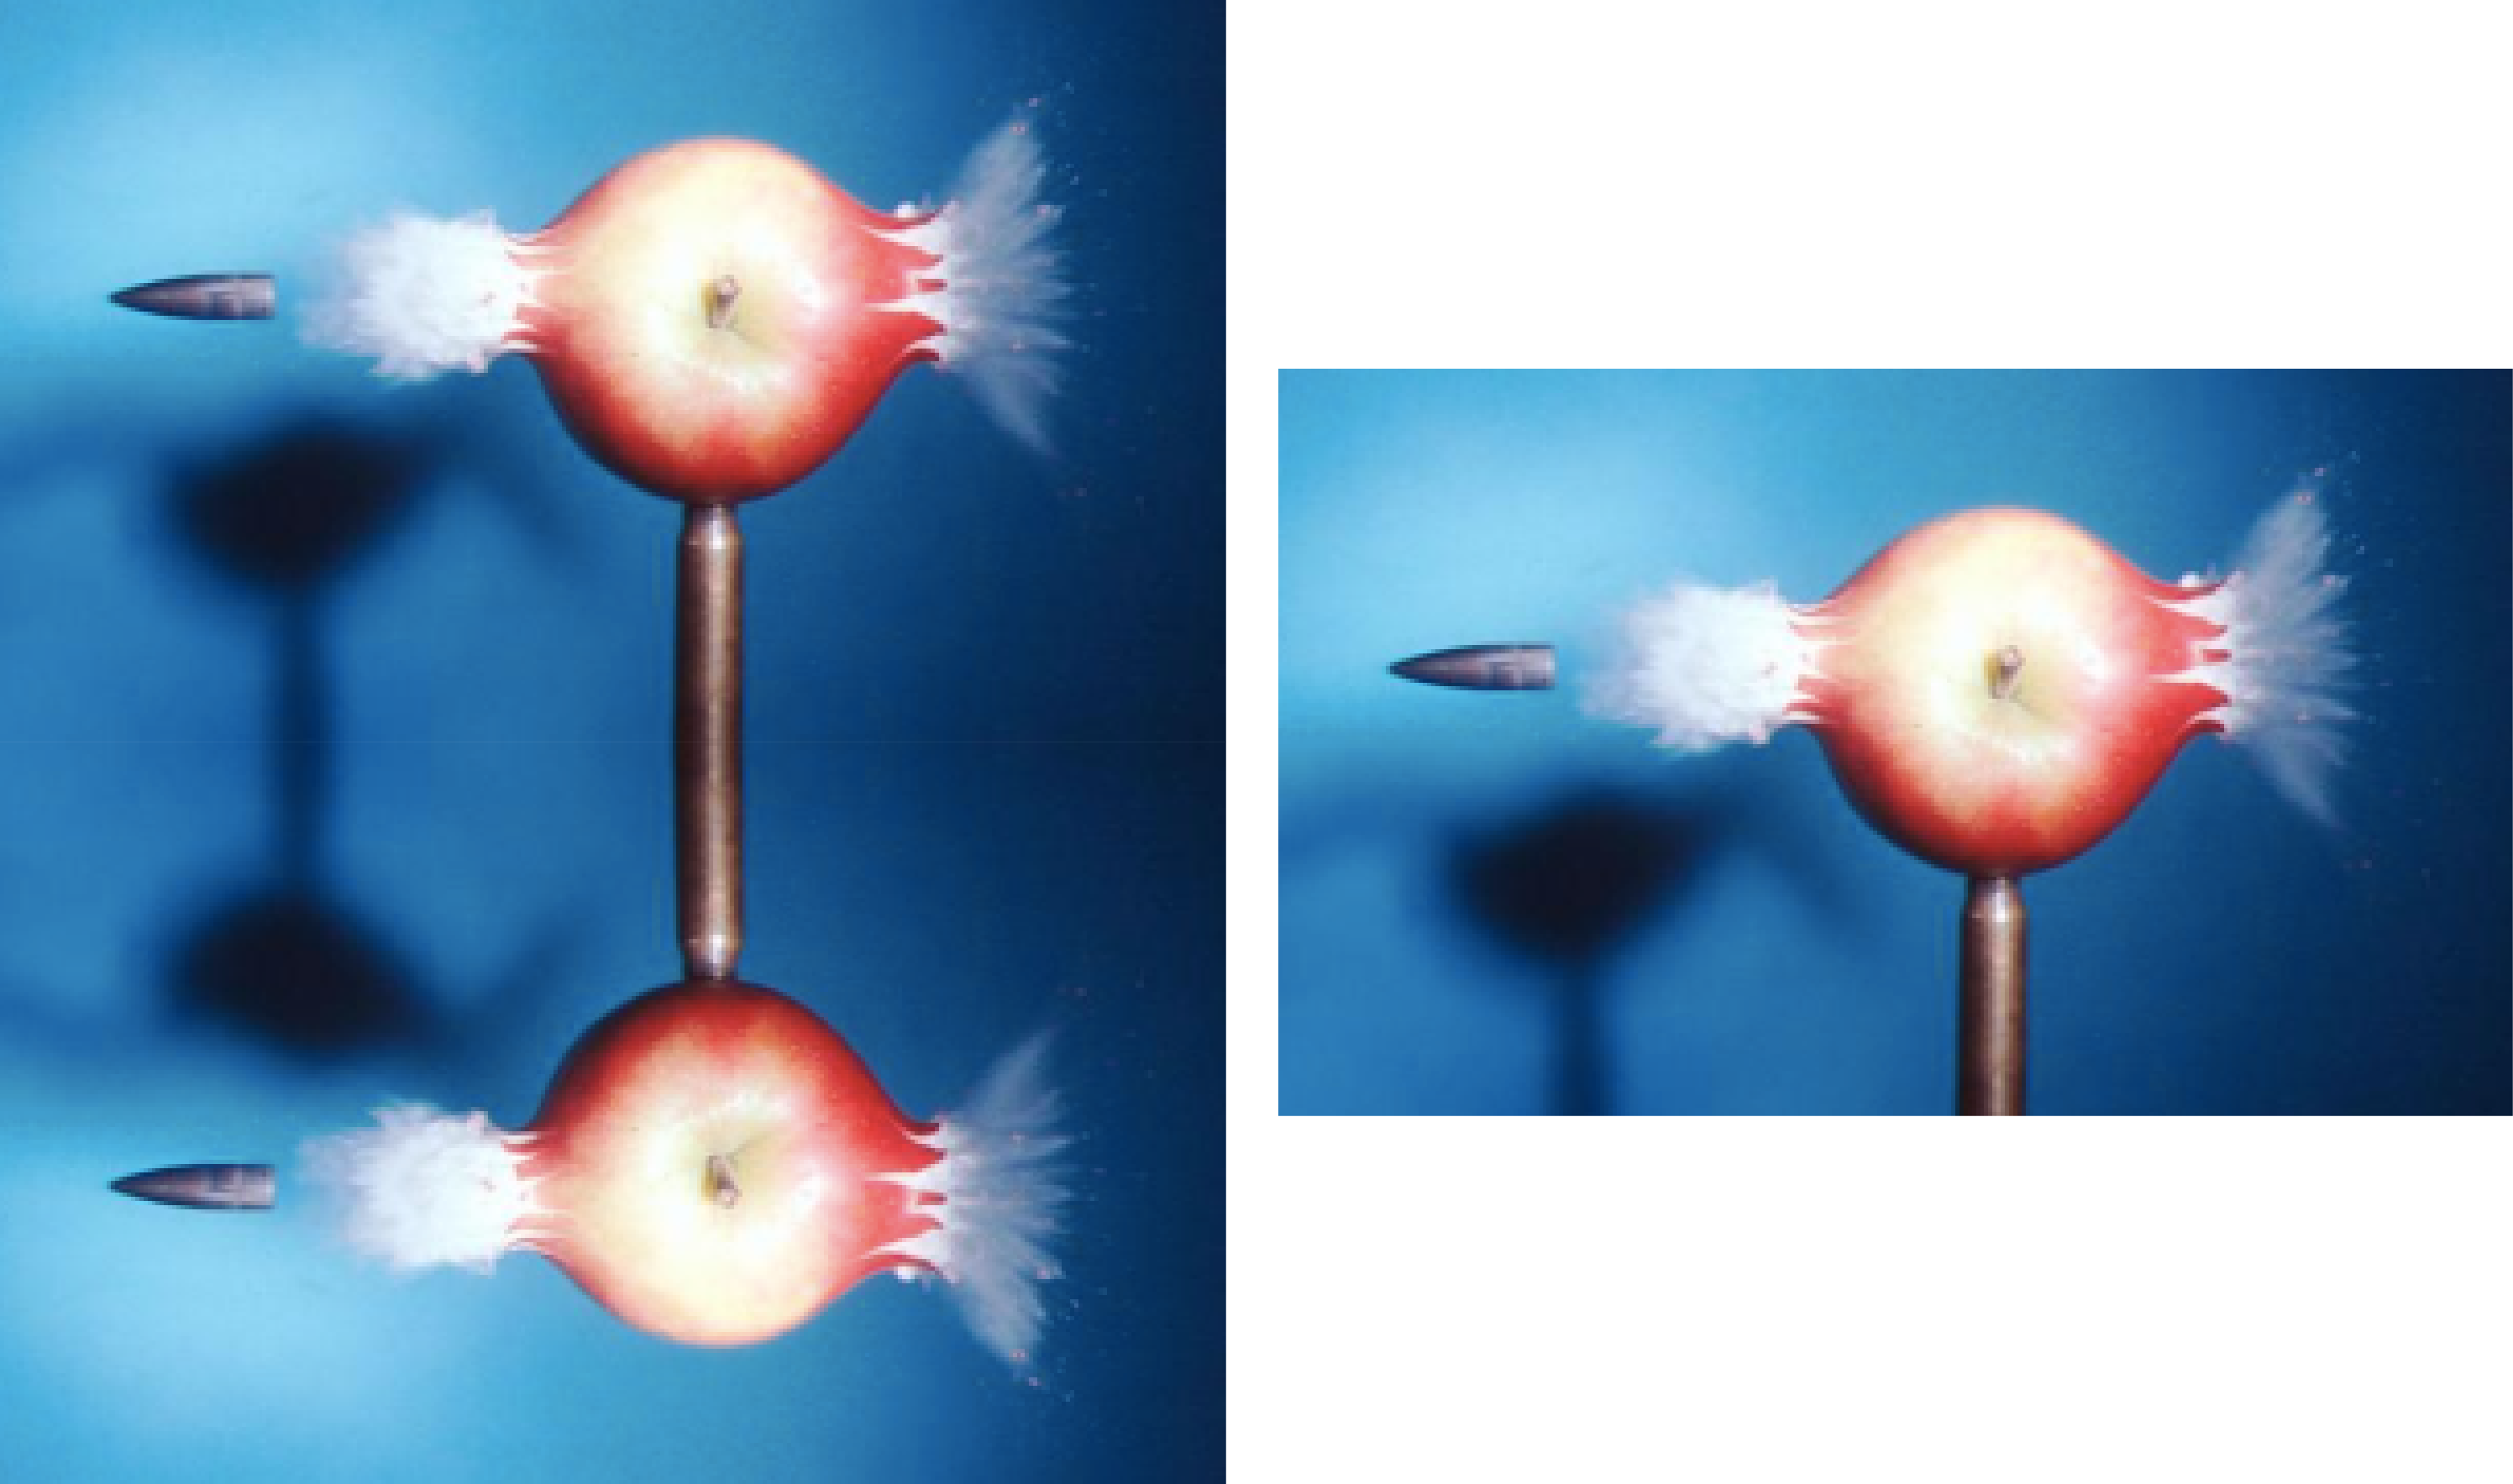
The modified image (left) will give you a smooth light show, while the original (right) will have a visible "seam" as the slit-scan transitions from the last row of pixels to the first again.